Build Your Own One-of-a-Kind Wood Frames | DIY Unique Picture Frames

Want to Build Your Own Unique Picture Frame from Wood?

Building DIY One-of-a-Kind Wood Framesbuild your own unique wood picture frame

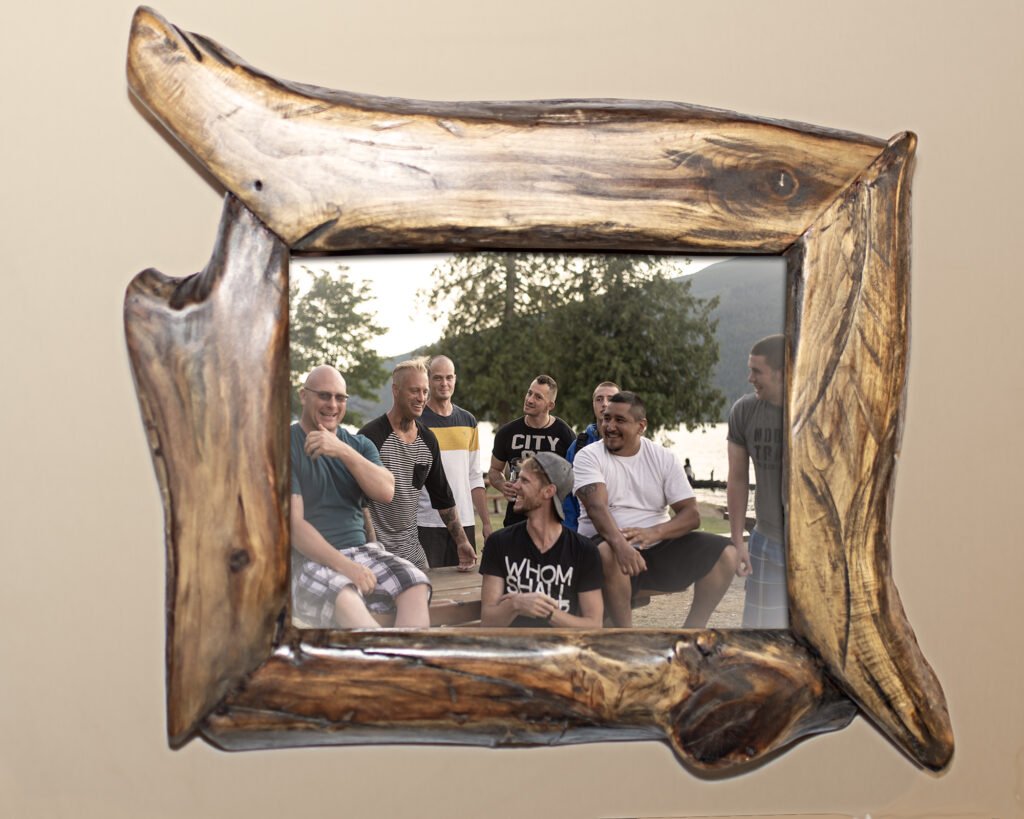
To make your own unique one-of-a-kind wood frame, you’ll need a few basic tools. Here’s a list of essential and not-so-essential tools and materials:

  1. Miter Saw or Miter Box with Hand Saw: For cutting the wood at precise angles, typically 45 degrees for corners.
  2. Table Saw: These are used for cutting the lengths of wood to the required dimensions.
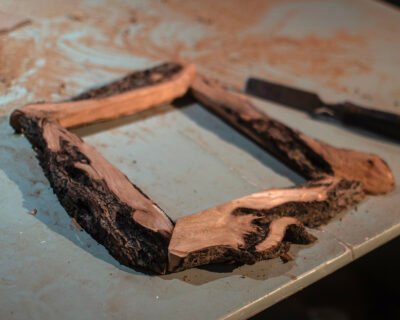
  3. Clamps: These are helpful for holding the frame pieces together while you’re assembling them. But they are difficult to use with unusual-shaped frames / live edge frames. You can just make sure the frame sides are firmly pressed together by hand. Just be sure they will not get bumped before the glue is dry.
  4. Brad Nailer or Screw Gun: These can be used to reinforce the joints. A brad nailer can make the process fast and easy, but using screws will be much more solid. Just be sure to pre-drill holes so as to not split the wood.
  5. Sandpaper and / or Mouse Sander: Sanding is necessary to smooth out any rough edges or surfaces on the wood that you don’t want. Use 3 or 4 different grits, such as 80 grit to start, working down to 120, 220, 280, 320, etc. This depends on how smooth you want to go.
  6. Tape Measure: A tape measure will be essential for getting the proper lengths for the side pieces of your unique picture frame (or not-so-unique picture frame, if that is your thing).
  7. Safety Gear: You will probably want to wear safety glasses and hearing protection when doing your table saw work and miter cuts. Additionally, consider using a
  8. DIY one-of-a-kind wood frames - Make your own unique picture frame - point gun - removeable glass and backing
  9. dust mask or respirator when sanding and cutting your stocks of wood down on the table saw. It creates a LOT of dust.
  10. Dado blade: This is for cutting the Rabbet grooves into the back of each piece for where the glass, backing and picture will sit.
  11. Chisel: Creative wood frames can be as creative as you want them to be! Also, you may have instances where, once the glue is dry, you’ll have corners where the joints are not flush on the surface.  Or you didn’t get your “opening” quite big enough and will have to do a bit of chiseling to make your recess for the glass, etc. wide enough.
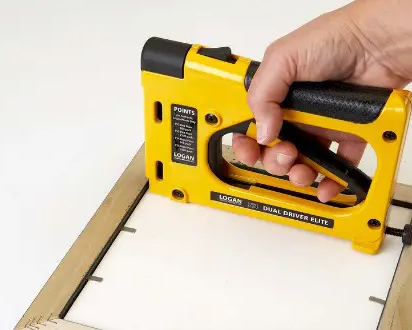
  12. Flex Point Gun: This is an invaluable tool if you plan to continue making creative wood frames. A flex point gun makes securing the glass and backing into your unique wood frames easier than you would believe! It is kind of like a stapler, and makes your glass / backing and picture very easily removeable.

Craig’s Tall Tales               Why Custom Wood Picture Frames Are So Popular as Gifts

10 Unique Framing Ideas – Creative Picture Framing

Materials for Building DIY One-of-a-Kind Wood Frames

  1. Wood Stain and Finish: If you want to stain or finish your frames, you’ll need appropriate products for this purpose. Sometimes the most unique thing about a unique picture frame is the grain of its wood. With just a subtle coat of lacquer, you can greatly enhance the natural wood grain.   Cook Your Own Linseed Oil & Wax Finish
  2. Wood Glue: A strong wood glue is essential for securing the corners of the frame together. I use Gorilla wood glue.
  3. Wood Filler: This can be used to fill in any gaps or imperfections in the wood before spraying and / or staining.
  4. Steel Wool or Scotch-Brite Pads: This is like really fine sandpaper. It is especially good if you want to remove some of the sheen after you spray (or brush) on your clear coat, if you so desire.

    one-of-a-kind wood frame unique with flex-points and removeable hanger
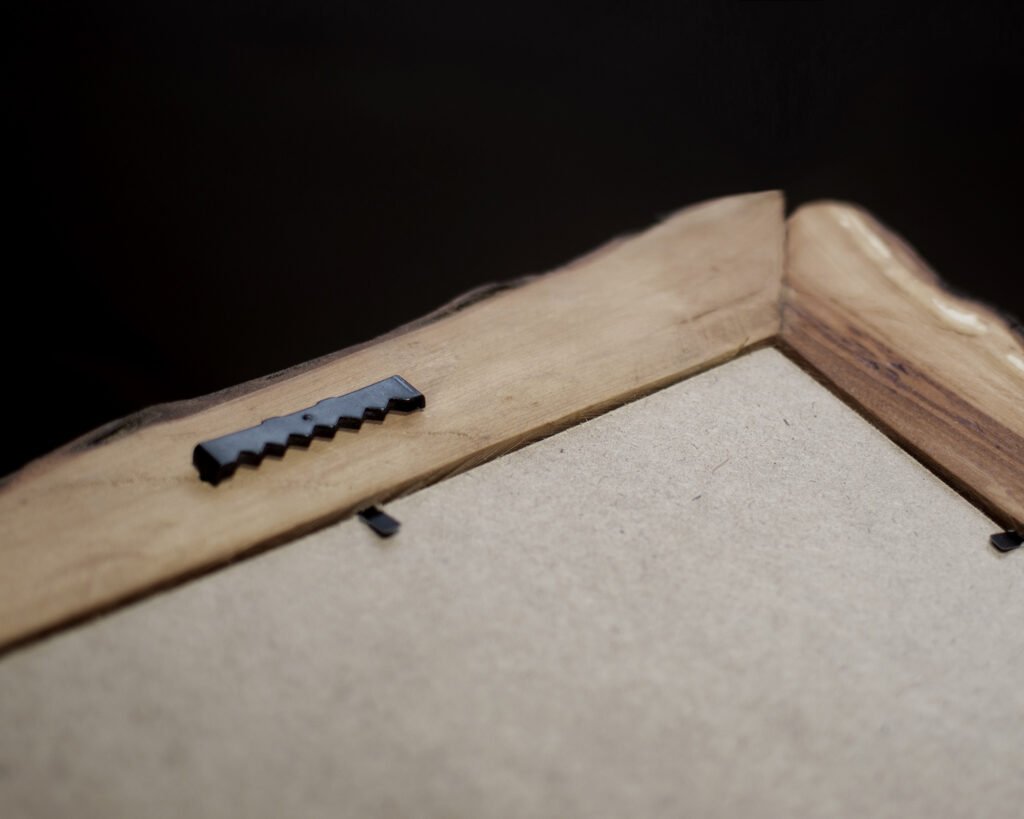
    Nail-free sawtooth hanger, hardboard backing and flex points
  5. Hanging Hardware: The best hangers for wood picture frames under an 11 x 14 frame size are saw-tooth hangers. You can get saw-tooth hangers that don’t require nails to fasten to the back of your DIY unique picture frame. You just press or hammer them in, and they are easily removeable.

Shop Craig’s Unique Frames on Etsy

Building Your DIY Unique Picture Frame

Building your own creative wood picture frame can be a rewarding project that allows you to customize the frame to perfectly fit your artwork or photograph. Here’s a step-by-step guide to building a creative unique picture frame:

  1. Find the Wood!: This is the fun part, and the most important part of the process, which will greatly determine the level of uniqueness of a unique picture frame! That said, you may want to start out with building a frame out of pre-milled wood from Home Depot. Or some scrap wood you have lying around, before you put on your camouflage jungle gear and hiking boots to hit the bush. But the following instructions will be for building live edge, unique picture frames like you see at Craig’s Unique Frames.making your own diy one-of-a-kind wood frames from wood
  2. Measure and Cut the Wood: After finding stocks of wood that will be cuttable through your table saw, run your stocks of wood carefully through the table saw. You will be cutting them roughly in half (a saw with at least a ten-inch blade raised as high as it will go is essential). Then run each piece through again, shaving off the sides opposite your now flat side (which will be your backs), if you so desire. Run them through again if you need to, to get them to around 5/16″ in thickness.Now decide which side of each piece you want to be the flat inside edge and cut it. This is a bit difficult because the saw’s fence isn’t much good for this part, due to that edge not being straight.I use the saw blade itself to keep the piece straight as I run it through to make the inside edge straight.You’ll need four lengths of wood: two longer pieces for the top and bottom of the frame, and two shorter pieces for the sides.
  3. Cut Your Rabbet Grooves: You’ll need to run one edge of each piece through your table saw now, once you’ve switched to your dado blade (or “stacked” regular blades). learn about this here. Your groove on each piece should be 1/4 – 5/16″ deep and 1/4 – 5/16″ wide.
  4. Cut Your 45 Degree Corners: Cut one end of each piece to 45 degrees on your miter saw. Then flip the piece end-for-end (so that it is now upside down). Measure from against the saw blade and the inside of your groove to the inside of the groove on the other end. Slide the piece either way until your measurement is a hair longer (that’s the technical term) than the dimension of the art piece / picture going into the frame. Once all angles are cut, fit the frame together upside down and check your measurements to make sure the “opening” will fit the piece going into the frame.
    Why Is Custom Framing So Expensive? | Custom Live Edge Frames
  5. Glue the Frame Together: Apply wood glue liberally to each end of each piece and press them tightly together. Check your
    one-of-a-kind wood frames - Crafting your own DIY Unique picture frame
    One of Craig’s own unique picture frames in the process

    measurements, adjust however necessary, make sure everything is tightly pressed together. Allow the glue to dry for several hours (overnight, ideally).

  6. Chisel / Sand: This is all up to you, after all, it is your unique wood picture frame. It can be however rough and rustic, or as smooth and elegant as you want it to be.
  7. Finishing Your One-of-a-Kind Wood Frame (Optional): If desired, you can stain the frame to match your décor or personal preference. Wipe the stain  and let it dry (you can speed this up by using a heat gun or hair dryer!) before proceeding to your clear coat. You can brush on your lacquer, or whatever you decide to use to give some sheen and bring out the grain, or use a “spray bomb” from Home Depot or Walmart…Or wherever you buy aerosol clear coat cans. This clear coat will also seal the wood and help protect your new unique picture frame from damage to the surface.
    Why American Elm Wood Frames? | About American Elm Wood
  8. Attach the Hanging Hardware: Make sure to do this before you install the glass, if installing your hanger requires any hammering. Before officially attaching the hanger, check the balance of the frame by hanging it on your finger. You may have to put the hanger a tad off-center if it is heavier on one side or the other.
  9. Cut Backing and Install with Glass and Picture: Set the fence of your table saw to cut a piece if 1/8″ hardboard to the proper dimensions. Then install it with the same-size glass (you can use glass from another frame, or get a piece cut to size at a glass shop), with your picture in between. Then, if you don’t have a point gun, you can use finishing nails. Use your own discretion as to how many nails it will require. You don’t need to get carried away with this. Often one nail on each side will suffice, depending on the size of the frame. Just make sure to remove the glass before hammering nails in.
    You can use aUnique Picture Frame 9x12 - Creative one-of-a-kind wood frames custom-crafted second piece of hardboard to assimilate the glass for getting the proper depth while inserting the nails. Then bend the nails up to remove the inner hardboard piece and replace it with the glass. Then, of course, bend the nails back down.
  10. Hang Your New One-of-a-Kind Wood Frame: Finally, find a stud to put a nail in (or use a drywall anchor), and the rest is pretty self-explanatory!  Craig’s Photography on ViewBug

By following these steps, you can create your own unique custom one-of-a-kind wood frames that perfectly showcase your artwork or photographs. Feel free to experiment with different wood species, finishes, and styles to achieve the look you desire.

Check out some of Craig’s own one-of-a-kind wood frames from the past

Why Is Custom Framing So Expensive? / Custom Live Edge Frames

Unique picture frame 5x7 - DIY one of a kind wood frame custom

What Is Diamond Willow? | Willow Wood Frames

Craigs Unique Frames Home Page


Leave a Comment